Blog Posts, Paperieink

Moose Wonderful Time!

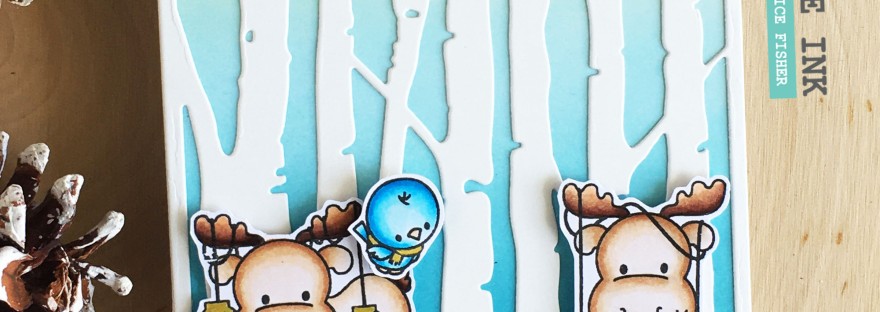
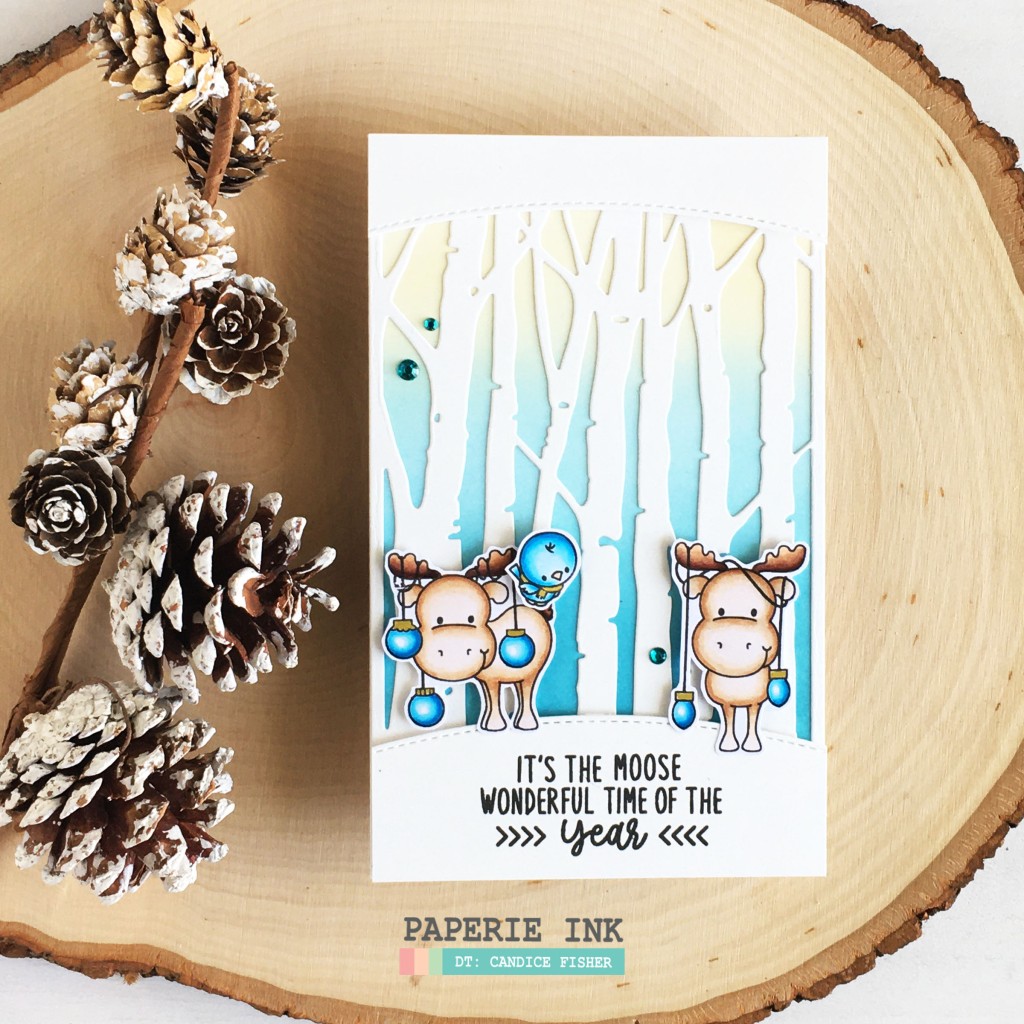
These little moose from Paperie Ink stamps are the most adorable!!! They are perfect for creating a sweet scene with birch trees!

I used these products for my mini slimline design:

I began my mini slimline with a 6 1/2 x 4 card base.

For my background, I first die cut the birch trees from Bristol Smooth cardstock and trimmed another piece to fit behind and inked it with broken china, tumbled glass, and antique linen. I then die-cut another piece of Bristol Smooth with a stitched curve and stamped the sentiment on the bottom piece.

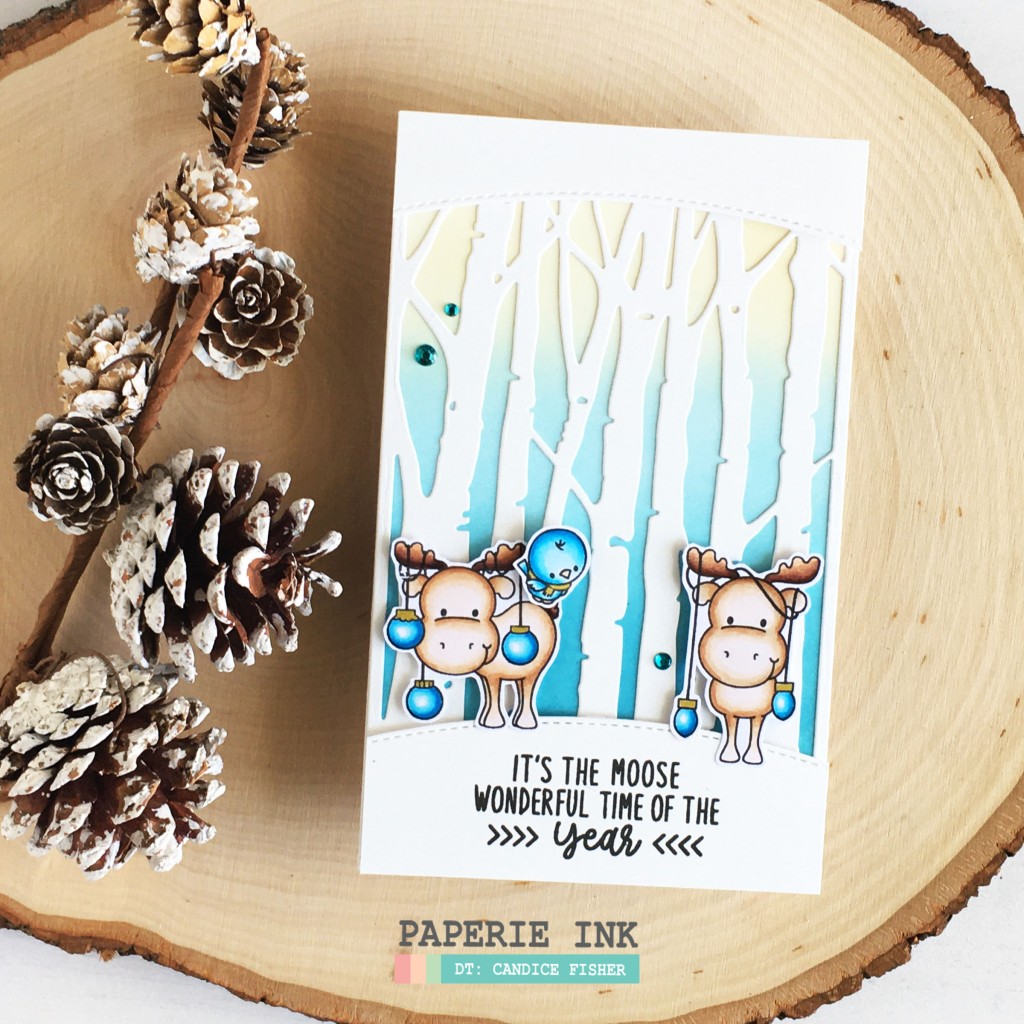
Next, I stamped the moose and bird, colored them with copic markers, and fussy cut them out. I finished the card by adding them with foam tape and sprinkling some blue jewels!

Thank you for visiting with me today!

Candice

Blog Posts, Paperieink

Merry and Bright Penguins!

I can’t resist these cute little Christmas penguins from Paperie Ink stamps for a merry and bright mini slimline card!

I used these products for my mini slimline design:

I began my mini slimline with a 6 1/2 x 4 card base.

For the background, I trimmed a piece of Bristol Smooth a little smaller than my card front, inked it with worn lipstick and spun sugar, and splattered with white paint and gold shimmer spray. While that dried, I inked some scraps of Bristol Smooth with rustic wilderness, mowed lawn, and bundled sage and cut out with pine boughs.

I then stamped another piece of Bristol Smooth with the small polka dot BG stamp with black ink and cut out with the ‘Merry and Bright’ and then 3 more from thick black cardstock. I then layered the black pieces and then offset the polka dot one on the top.

Next, I stamped the penguins, colored them with copic markers, and fussy cut them out. To put the card together, I arranged the pine boughs behind the ‘Merry and Bright’ and used foam tape to place the penguins around the large sentiment. I finished with a sentiment heat embossed in white on a small banner and sprinkled some red jewels around!

Thank you for stopping by with me!

Candice

Blog Posts, Paperieink

JOY!

These little adorable Woodland Ornaments from Paperie Ink are perfect to hang anywhere on your cards!

I used these products to create my slimline design:

I began my slimline with an 8 1/2 x 3 1/2 card base.

For the background, I first trimmed a piece of Bristol Smooth a little smaller than my card front, inked it with worn lipstick and spun sugar, and splattered it with some white paint. While that dried, I then inked some more pieces of Bristol Smooth with rustic wilderness, mowed lawn, and bundled sage, and cut the out with the pine boughs.

I then created the JOY by heat embossing the plaid in red on a sheet of Bristol Smooth and then cut it out using my Cameo Silhouette.

Next, I stamped the ornaments, colored them with copic markers, and fussy cut them out. I then heat embossed the strings in gold. To put the card together I layered the pine boughs behind the JOY raised with foam tape and hung the ornaments from each letter and sprinkled a few gold domes around!

Thank you for visiting!

Candice

Blog Posts, Paperieink

From Our Gnome to Yours

I am a sucker for any gnomes out there and this little Christmas Gnome set from Paperie Ink stamps is simply irresistible!

I used these products to create my card:

I began my card with a 6 1/2 x 5 card base.

For my background, I heat embossed the diagonal pattern with black on a piece of red cardstock and adhered to the center of my card front. I then die cut the stitched window from Bristol Smooth cardstock, adhered with foam tape, inked the insert with frayed burlap, and glued in the center.

I added the oversized JOY from black cardstock and tucked the Kraft stitched banner under with the sentiment heat embossed on the side.

Next, I stamped the gnome, mushroom house, and strings, colored them with copic markers, and fussy cut them out. I arranged them under the JOY and from the window and banner and finished with a sprinkle of green jewels!

I love the colors of this card and that gnomes are perfect for a masculine Christmas design!

Thank you for stopping by!

Candice

Blog Posts, Paperieink

Merry Christmoose!

These adorable moose from Paperie Ink stamps are celebrating the Christmas season!

I used these products to create my slimline design:

I began my slimline with an 8 1/2 x 3 1/2 card base.

For the background, I first die cut the stitched window panel from Bristol Smooth cardstock and another using the Twinkle die and trimmed it a little smaller to fit behind the windows. I inked the Twinkle panel behind each window with seedless preserves and chipped sapphire and added the vellum snow hills behind each and added to the front with foam tape.

Next, I stamped the moose, birds, and accessories from the sets listed above, colored them with copic markers, and fussy cut them out. I arranged them into the windows with foam tape and glue. I finished with a white heat embossed sentiment on the inked banner and a few gold jewels!

I love the colors of this Christmas card and you can head on over and check out all the great cute Christmas stamps sets at Paperie Ink!

Thank you for visiting!

Candice

Blog Posts, Paperieink

Merry Everything!

I love these oversized sentiments from Paperie Ink stamps to create your own background for a fun card like I did on this Christmas slimline card!

I used these products to create my slimline design:

I began my slimline with an 8 1/2 x 3 1/2 card base.

For the background, I trimmed a piece of pattern paper a little smaller than my card front and adhered to the card. I then die cut the stitched panel from Bristol Smooth cardstock, inked it with kitsch flamingo and spun sugar, and repeatedly stamped the sentiment.

The tags I cut out from the Bristol Smooth cardstock and cut 2 stitched circles. I taped off the square tag and inked it with salvaged patina along with the 2 stitched circles. I popped them up with foam tape and added some black twine to each.

Next, I stamped the flamingos and leaves, colored them with copic markers, and fussy cut them out. I then stamped the oversized sentiment one more time using pink ink, cut it out, and adhered it with a leave on the square tag. The other images I added to the circle tags and finished with a few pink jewels!

I always love to use non tradition colors for Christmas cards and you can try it on your next card!

Thank you!

Candice

Blog Posts, Paperieink

All is Calm, All is Bright

Have you started on your Christmas cards yet?! I have a quick and adorable mini slimline card for you today using the new release from Paperie Ink stamps!

I used these products for my mini slimline design:

I began my mini slimline with a 6 1/2 x 4 card base.

For the background, I trimmed a piece of Bristol Smooth to fit the front of my card, die cut the stitched squares near the top and then moved it down and cut the third row. I then inked 3 of the inserts with tattered rose and the other 3 inserts with speckled egg and heat embossed one with the sentiment in gold.

I adhered the panel with foam tape onto the card front and glued my inserts in for great dimension for my adorable images!

Next, I stamped the slothes and accessories, colored them with copic markers, added accents with a gold pen, and fussy cut them out. I finished by adding them in the squares with foam tape and sprinkled some blue jewels around!

If you are procrastinating Christmas cards this design was quick and easy for making multiples!

Thank you for stopping by!

Candice

Blog Posts, Paperieink

My Pawlidays!

Did you hear that Paperie Ink stamps has their holiday release out?! I am showcasing the adorable My Pawliday stamp set with you today on my mini slimline card!

I used these products for my mini slimline design:

I began my mini slimline with 6 1/2 x 4 card base.

For the background, I first die cut the scalloped panel into my mini slimline size by using the partial die cut method (run through partway, rotate and line up, and run through again!), inked it with aged mahogany, victorian velvet, and milled lavender, and splattered with white paint and gold shimmer spray.

Next, I stamped the puppy tree, puppies, rug, and chair, colored them with copic markers, and fussy cut them out. I arranged them all around the oversized sentiment that I had layered with the top from blue foil cardstock and finished with a few blue jewels!

Now you can take some time and check out the new release from Paperie Ink stamps HERE!

Thank you for visiting!

Candice

Blog Posts, Paperieink

All is Calm, All is Bright

How many of you love those big sentiment stamps?! This new set, Giant Holiday, from Paperie Ink stamps gives you 2 different Holiday sets in one!

I used these products to create my quick mini slimline design:

I began my mini slimline with a 6 1/2 x 4 card base.

For the background, I inked a piece of green cardstock with mowed lawn, rustic wilderness, and black soot and heat embossed the beautiful large sentiment in gold along the bottom.

Next, I heat embossed the ornament cuties in gold, colored them with shimmer watercolor paints, and fussy cut them out. I adhered them with foam tape at the end of the heat embossed bead strands and finished with some more sparkle with gold jewels!

I love the shine in this card and feel this would be a fabulous one to create multiples with lots of different color palettes!

You can also check out the full new release over at Paperie Ink stamps HERE!

Thank you,

Candice

Blog Posts, Paperieink

‘Tis the Ski-son!

These cuties from Paperie Ink stamps are hitting the slope on my slimline card!

I used these products for my slimline design:

I began my slimline with an 8 1/2 x 3 1/2 card base.

For the background, I first heat embossed the sentiment in white, inked it with chipped sapphire, blueprint sketch, stormy sky, and tumbled glass, and splattered with white paint and gold shimmer spray.

I then die cut the mountains, inked them with brushed corduroy and antique linen, and topped them with glitter snowcaps. I also die cut the fence from antique linen inked paper and the boards from vintage photo and tucked them between snow hills cut from white cardstock.

Next, I stamped the images from the stamp sets listed above, colored them with copic markers, and fussy cut them out. I adhered them to the snow hills either with glue or foam tape to give dimension and finished with some stickles to give glitter snow to tie into the snowcaps!

Thank you so much for visiting!

Candice