Blog Posts, Paperieink

Happy Vibes!

I find that I am so enjoying creating fun cards with Paperie Ink stamps!  I think they are just the right size and amount of cuteness that I truly love reaching for them!  A plus, they seem to go so well with my huge (did I say HUGE) stash of 12 x 12 pattern papers that I just had to have!

0526_Candice 1

There are a few things I love about this card, one it was super quick to make, two the color palette is simple which helps it stand out, and three those sloths are just so squeezable!

0526_Candice 3

For the background, I trimmed some cloud pattern paper to fit my 8 1/2 x 3 1/2 card base.  I then created the stitched slimline frame by off setting the windows to fit my sentiment along the bottom.

0526_Candice 2

Next, I stamped the sloths and vines from the Happy Vibes set and the leaves from the Toucan Party set, colored them with copic markers and used my scan n’ cut to cut them out.

I added a few embellishments with clear sequins and green nuvo drops.

Thank you for visiting!

Candice

Blog Posts, Paperieink

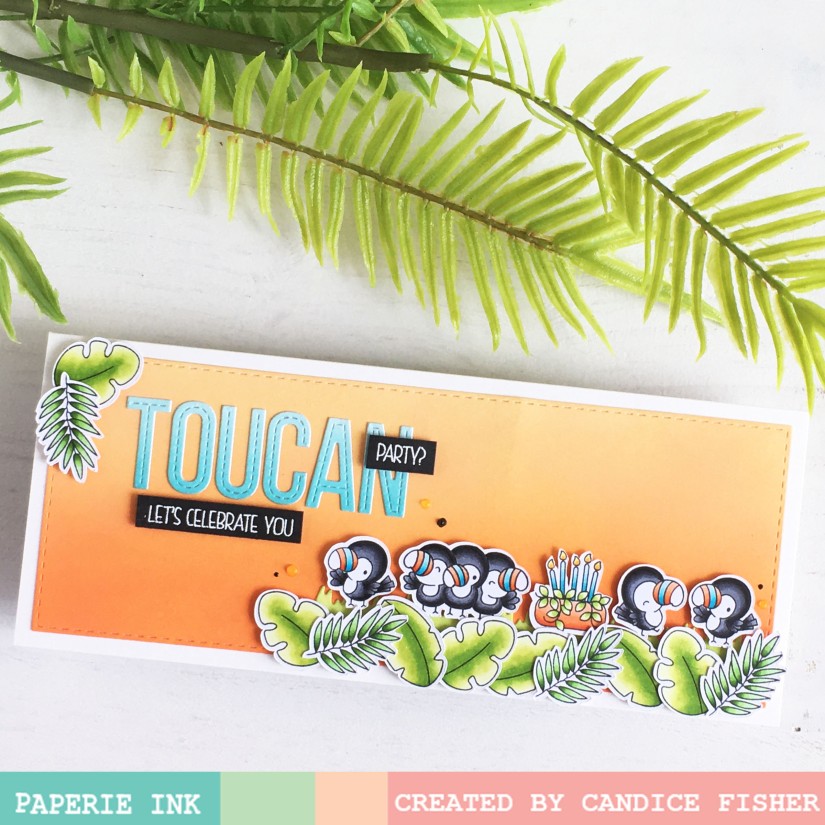
Toucan Party?!

Who wouldn’t want to celebrate with these adorable little toucans?!  I just adore this Toucan Party stamp set by Paperie Ink!

0523_Candice 1

For my background, I die cut a stitched slimline panel from Bistrol Smooth and inked with ripe persimmon, carved pumpkin & dried marigold.  I adhered it onto my 8 1/2 x 3 1/2 card base.

0523_Candice 3

I then created the sentiment by die cutting the stitched letters from the same Bistrol Smooth and inked them with salty ocean & tumbled glass.  I heat embossed the sentiments in white on black trimmed banners.

0523_Candice 2

Next, I stamped the toucans & leaves, colored them with copic markers and used my scan n’ cut to cut them out.  I adhered them to the card front with adhesive glue and some foam tape.  I also put a die cut grass strip that I inked with mowed lawn & twisted citron down first to ground my little toucans.

I finished with a few nuvo drops in black and orange.

Thank you for stopping by,

Candice


Blog Posts, Paperieink

It’s 5 o’clock Somewhere!

How many of you are loving this new release from Paperie Ink?  It is just full of cuteness like this stamp set, Don’t Worry Be Happy!

0519_Candice 1

I began with an 8 1/2 x 3 1/2 card base which is just right for your standard size envelopes.

For the background, I first trimmed a piece of thick white cardstock to fit over my card front and die cut the staggered circles to fit the shaker elements.  I then inked a piece of Bistrol Smooth with mermaid lagoon, peacock feathers & cracked pistachio to go behind the circles.

0519_Candice 3

I made the shaker by adding acetate directly behind the circles and put foam tape around the circle edges and filled with the blue sequins.  I placed the card front over the foam tape to seal the shaker.

0519_Candice 2

Next, I stamped the cuties from Don’t Worry Be Happy stamp set and the flowers from the Hello Sunshine stamp set, colored them with copic markers and used my scan n’ cut to cut them out.  I also added some accents with a white gel pen.

To finish the card, I heat embossed the sentiment in white on a trimmed banner.  I added some clear nuvo drops for some water droplets!

Thank you for visiting with me today!

Candice

Blog Posts, Paperieink

Fiesta Time!

I absolutely love how all the images from this one set, Llama Say, from Paperie Ink work to create sweet little scenes!

0512_Candice 1

I used these products to create my fiesta scenes:

I began my card with an 8 x 3 card base which is just the right size for your standard envelopes.  It is a little smaller than my usual size so that the scallop would show as the base of the front of my card.

0512_Candice 3

For the background, I die cut the scalloped panel from thick white cardstock.  I then inked a piece of Bristol Smooth with picked raspberry, worn lipstick, carved pumpkin, mustard seed, twisted citron, mowed lawn & salty ocean.  I laid my letters down on the inked paper in the order I would have it on my card and ran it through my die cutting machine.  I then ran the letters through again on thick black cardstock.  I layered them with a light off set and adhered with foam tape. (If you notice, I put the S upside down! Oh well!)

0512_Candice 2

Next, I stamped all the images from the new Llama Say set, colored them with copic markers, and used my scan n’ cut to cut them out.  I added some accents with a white gel pen.

To ground my scenes, I die cut some sand, inked with brushed corduroy and antique linen oxide inks and glued them down with the background images and used foam tape on the front ones.

To finish the card, I stamped the Hola and Time from the Llama Say set in Versafine black and fussy cut out.  I added some nuvo drops in the same colors I used for the fiesta to tie it all together.

Thank you for visiting with me today!

Candice

Blog Posts, Paperieink

Seasun of Fun!

I am soooo in love with these adorable little beach piggies from the new release at Paperie Ink!  This cute set is called Seasun of Fun and is available today for pre-order!

May_Candice 1 Seasun of Fun

I used three of the Paperie Ink stamp sets to create my card, the new Seasun of Fun, the chicks are from the My Somebunny set and the beach ball is from another new set, Don’t Worry Be Happy.

I began my card with an 8 1/2 x 3 1/2 card base which fits perfectly into your standard size envelopes.

May_Candice 3 Seasun of Fun

For the background, I first taped off the bottom and inked my sky with squeezed lemonade, spun sugar & worn lipstick oxide inks.  I then switched and taped off the sky covering with scrap paper and inked the sand with tea dye & antique linen.  I then splattered with a damp paint brush and shimmer sprays in browns and white.

While I let that dry, I die cut the wave from Bristol Smooth cardstock and inked with salty ocean.

May_Candice 2 Seasun of Fun

Next, I stamped all the images from the Seasun of FunDon’t Worry Be Happy and My Somebunny stamp sets, colored them with copic markers and used my scan n’ cut to cut them out.  I added some accents with a white gel pen.

To put the card together, I stamped the sun and sentiment from the Seasun of Fun set in Versafine black ink and used foam tape on the colored sun over the stamped one.  I alternated some images with foam tape and glued down others and added the wave across the bottom with foam tape too.

Thank you for visiting with me today and I hope you love this new release as much as I do!

Candice

Blog Posts, Paperieink

Don’t Worry. Be Happy!

The new release at Paperie Ink will be coming this Friday, May 9th!  And boy are you in for a treat of cuteness!  Today I am giving you a sneak peek of the new stamp set, Hello Sunshine!

May_Candice 1 Hello Sunshine

I began my card with an 8 1/2 x 3 1/2 card base which is a perfect size for your standard envelopes.

For these cute critters on the floaties, I saw them on one of my favorite water rides, the lazy river!

May_Candice 3 Hello Sunshine

For the background, I first inked a panel of Bistrol Smooth with blueprint sketch, peacock feathers & cracked pistachio.  I then spritzed with some water and dabbed off with a paper towel and adhered directly to the card base.  I die cut the thick white cardstock with a stitched wave, stamping the sentiment from another new set, Don’t Worry Be Happy.

May_Candice 2 Hello Sunshine

Next, I stamped the cuties and flowers, colored them with copic markers and used my scan n’ cut to cut them out.  I accented them with a white gel pen and adhered them with foam tape.

To finish off the card, I added some clear nuvo drops as water drops.

I know Friday is so far away, but just keep watching for more inspiration until you can get your own sets from this fabulous release!

Thank you for stopping by,

Candice

Blog Posts, Paperieink

We Bee-long Together!

If you haven’t seen this new stamp company, Paperieink, you are in for a treat of pure cuteness!  I just adore these chubby bees for a bright spring card!

paperieink-bee long together

I began with an 8 1/2 x 3 1/2 card base which fits perfectly into your standard envelopes.

For the background, I die cut the scalloped panel from cloud pattern vellum.  I then die cut the stitched BEE multiple times from thick white cardstock and layered.  The sentiment I stamped with versafine black and trimmed into two banners, gluing around the BEE.

paperieink-bee long together close up

Next, I stamped all the images from the Hap Bee stamp set, colored them with copic markers and used my scan n’ cut to cut them out.

paperieink-bee long together side

I adhered them all to the card either by foam tape or glue and then just added glue behind the images on the pattern vellum and adhered to the front of the card.

For a final touch, I added a few blue domes.

Paperieink just had their new release and it is full of cute critters!

Thank you for stopping by today!

Candice


Blog Posts, Paperieink

Keeping It Real.

Ohhhh, do I have to share with you all this fabulous new stamp company that I found on Etsy called Paperie Ink!  They have a new release out right now too and you will be seeing a few more cards from me using those too!

paperieink unicorns

I began my card by creating an 8 1/2 x 3 1/2 card base which fits into the standard and size 9A envelopes.

For the background, I first die cut the scalloped slimline panel and inked the clouds with a stencil using abandoned coral and tattered rose oxide inks.

paperieink unicorns close up

Next, I stamped the unicorns & rainbows from the Magical Unicorn stamp set, colored with copic markers and cut out using my scan n’ cut.

I then die cut some clouds from thick white cardstock and glued the images to them.

paperieink unicorns side

To finish the card, I adhered the images and clouds with foam tape and added some nuvo drops in different colors.

If you love adorable critters, you should definitely take some time to check out her stamps, link in the profile of her IG HERE.

Thank you!

Candice